Introduction: Google Calendar Is More Than A Diary
There used to be a time when arranging a schedule meant pulling out a diary and flicking through the pages. It meant looking past the scribbles and the unreadable handwriting to find a spare space. It meant seeing the appointments you missed because… well, you forgot to look at your diary in time. And it meant looking for an hour that also suited the schedule of everyone else attending the event. It was always such a pain. However, this guide to using Google Calendar in 2023 and beyond will show you how to make the most of this digital calendar.
The growth of digital calendars had made it all so much easier. You no longer need to keep a diary with you at all times. As long as you have your smartphone with you, you’ll have access to your calendar. The calendar will send notifications so you can be confident that nothing is ever forgotten and no appointment is missed. And, you can even share your calendar with others so that you can see what a colleague has lined up and can find spare time to meet. It’s a whole new way to organize time, and it’s been a remarkable change. It’s also been a sudden and unnatural change.
Changes to Google Calendar
In October 2017 that lack of clarity became clear. Google upgraded its calendar for the first time since 2011. It rolled out a tool that’s cleaner and neater that clears away some unnecessary features (and a few that people enjoyed.
The result is an immensely powerful time management tool that we don’t really know how to use. We content ourselves with adding an event and we’re surprised, sometimes unpleasantly, when our Google calendar automatically adds an event taken from a private email. But we only use a fraction of its functions and we ignore many of the ways in which our calendar can improve our lives.
The Ultimate Guide To Google Calendar
In this guide to Google Calendar, we’re going to take you through all of Google Calendar’s amazing functions.
We’ll start with the simple stuff. Then, our guide to Google Calendar will go all the way through its advanced settings and look at a couple of ways to extend the powers of Google’s free time management platform.
1. Day 1: Getting Started
The good news is that you don’t need to do anything to get started with Google Calendar. As long as you already have a Google account, and about 1.2 billion people do, you don’t need to do anything more than open calendar.google.com or bring up your app. If you’ve signed into your Google account you’ll already be logged in. If you don’t yet have a Google account, when you open that page, you’ll be invited to register. It’s free and doesn’t take more than a couple of seconds.
If your smartphone uses Android, then you should find that Google’s calendar app is already installed. If it’s not on the home page, you might find it buried in your app drawer. It’s the one that looks like this:
![]()
![]()
Once you’ve opened Calendar in your browser or on your mobile device, you don’t need to do anything else. It will already be set up and ready for use. Both the website and the mobile app have a settings icon that lets you play with the way that Google Calendar looks and works—and you might also need to bring your old calendar into your new one.
Importing Your Calendar
Few people start their calendars with a blank slate. If you’ve been using a different calendar application, such as Outlook or Apple Calendar, you’ll need to import your data to Google Calendar. That shouldn’t be hard!
First, open your calendar on your computer. That will make it easier to save your data and move it around, and in any case, importing to Google Calendar can only be done on a computer, not on a mobile device.
In your source calendar, look in the menus for an Export function. Calendar data can take a number of different formats. CSV is the most compatible with Google Calendar but if you’re exporting from an Apple Calendar, choose vCard. Make sure that you know where you saved the data!In Google Calendar on your computer, click the settings icon at the top right. Under Import & export, choose Import.
Other Calendar Importing Options


That method should be straightforward enough, and it shouldn’t present you with any problems. But if moving from an Apple Calendar to Google Calendar doesn’t go as smoothly as you’d like, there is a second method.
First, you’ll need to change the default calendar on your iOS device to your Google account. On your iPhone or iPad, open Settings > Calendar, and under Default Calendar, choose your Google account. Click iCloud > Accounts, and slide the button so that it’s in the On position.
The next bit is where it starts to get fun.
Log in to iCloud and click the Calendar icon. Choose the calendar you wish to export and click the broadcast icon on the right. You’ll see a window marked Calendar Sharing.
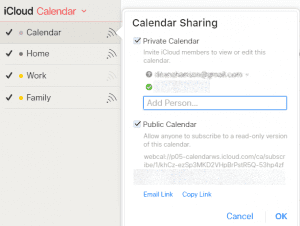

Check the box marked Public Calendar. Apple will generate a hashed URL. Copy the URL into your browser but change the “webcal://” at the start of the address to “http://” before pressing Enter. You’ll be prompted to save your calendar data as an .ICS file.
Once you’ve saved the file, don’t forget to uncheck the Public Calendar box. In Google Calendar, open Settings > Import & export > Import and import the file.
Calendar Website Settings
Once you’ve set up your Google Calendar, you can start playing with the settings. The settings icon for Google’s Calendar website is at the top right of the screen.
![]()
![]()
Click the cog and you’ll produce a drop-down menu, with the Settings at the top of the list. Choose Settings and on the left of the screen, you’ll see a list of all of the settings that you can change in your calendar.
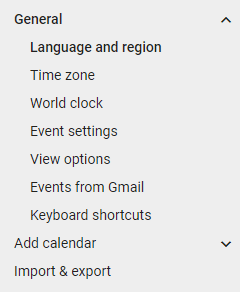

Language And Region
Some of those settings are straightforward. Google will set the Language and region based on the information it collects automatically from your Internet connection but you can change them if you want to use a language and region that’s different from your current location.
Time Zone
The same is true of your Time zone but this is a little more complex. Create an event, and Google will automatically use your local time. Invite someone else to join that event, and they’ll see it in their local time too.
So if you were writing in your calendar in New York that you had to place a phone call to someone in California, you might see the time of the call as 11am, but your colleague would see it as 8am. As you travel, the times used by your calendar adjust to the local time zone.
That change should happen automatically. Google will adjust its time zone based on your IP address or your telephone data. But if it doesn’t happen—if you’re using a VPN, for example, or not connected to the Internet—you can also display different time zone settings in your calendar wherever you happen to be, and you can change your calendar’s time zone settings manually.
To show more than one time zone setting on the calendar, open Settings, choose Time Zone and check Display secondary time zone.
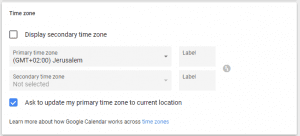

You’ll then be able to select a second time zone from a drop-down menu, and you’ll even be able to apply a label to those time zones to differentiate them. (In practice, you’re unlikely to need those labels; the place name should be sufficient.)
This is also where you can uncheck the option to update your primary time zone to match your current location, keeping the times on your calendar to one zone regardless of your location.
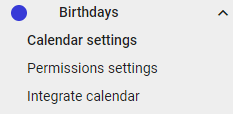
And if you’re using multiple calendars, a feature we’ll discuss later, you can sometimes create different time zones for each calendar. Click the calendar in the Settings, then select Calendar Setting and change the time zone. Not every calendar allows that change but it can be a useful way to keep track of someone else’s events in a different time zone.

World Clock
On a computer, you can also add a World Clock to your calendar. What it actually means is that you can add the time in various parts of the world to the side of your calendar.
Choose the World Clock option in General > Settings, check Show world clock and add the locations you want to choose. They appear on the left of the screen below the month view.
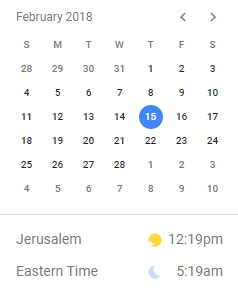

This isn’t something you’re going to see on your smartphone but when you’re pulling up your Google Calendar on your wider screen, being able to see the time in different parts of the world can be a nice touch.
Event Settings
Event Settings are more complex—but they’re also important. This part of the Settings includes a number of features that are often ignored but which significantly affect the way that your calendar will operate.
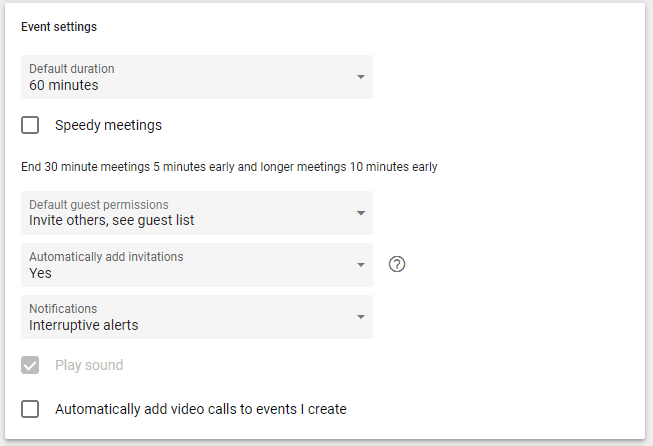

The first setting is the default duration of events that you add to the calendar. This can be a great source of frustration. Although Google lets you set specific times for each event you create, when you add an event, it will start with a set period of time. You can choose between 15, 30, 60, 90 and 120 minutes.
Use the right setting and you’ll make creating events quick and simple. Get it wrong, and you’ll be forever adjusting your events when you create them. The time setting during event creation, especially on a smartphone can be a little fiddly.
Think about the sorts of events that you’re most likely to be created. Will they be half-hour phone calls? One-hour meetings? Or two-hour sessions? Pick your most common duration and you’ll already have saved yourself some time.
Meetings
Beneath the default duration settings is the option to create Speedy Meetings. Check the box and 30-minute meetings will automatically be scheduled to last 25 minutes while longer meetings will be cut by ten minutes.
The aim, says Google, is to improve efficiency but a better use is when you’re scheduling back-to-back meetings. If you have to run from one meeting to another, it’s worth using that time to give yourself the chance to reach the meeting room, grab a breath of fresh air or take a bathroom break.
The Default Guest Permissions isn’t the most user-friendly piece of design but it sets the functions that other people invited to an event can use on that calendar event. There are only three options: guests can modify an event, changing the time, location or the duration, for example; they can invite others to take part in the event; and they can see a guest list of all the other people attending the event.
It’s worth remembering that you can change those settings. If you want someone to be able to change the time of the meeting if they need to, or you don’t want everyone to see who else will be there, those settings will give you more control over the entry in your calendar.
Invitations
The next setting is so unclear that Google had to add an explanatory note. The Automatically Add Invitations setting determines whether you see invitations automatically in your calendar or whether you’ll only see them after you’ve accepted them. You have three options. First, add all invitations to your calendar. Second, put all invitations to your calendar but only receive notifications about the events you haven’t declined. Or, third, choose only to see events that you’ve accepted on your calendar.
No one of those options is more efficient than the other but if your calendar is already crowded and you’re looking to prune events from your dates, then only automatically inserting events you’ve accepted is a good place to begin.
Notifications
The kind of Notifications you choose to receive when you’re sitting at your desk is important too. You can turn notifications off completely, restrict them to browser notifications, or you can go the whole hog and choose interruptive Alerts. Those interruptive alerts are pretty interruptive. If you’re in the middle of working, the loud bongs they send—and don’t forget that they’ll be repeated on your mobile devices too—will certainly wake you up. If you find them too disruptive, this is the place to come to tone down the pain.
Finally, in this section, you can choose to automatically add video calls to events. Unless you’re going to be using Google Hangouts for every event you create, you’ll want to make sure that box is unchecked. It won’t do you any harm but seeing an opportunity to make a Hangout call in every event description just clogs up the entry.
View Options
The View Options determine the appearance of your Google Calendar.
Again, these settings are hidden away down in the Settings menu but they have a direct effect on the appearance of your calendar both on your mobile device and on your computer. Some of them are also more useful than others. You probably don’t want the calendar to show declined events, or show week numbers, a feature that places a number next to each week in the year. But choosing to reduce the brightness of past events will help to keep the calendar looking clean. Being able to view calendars side by side in Day View is likely to be very useful if you’re using or managing multiple calendars used by a number of different people. Administrative assistants at big companies will want to make sure that they have that option.
The last three options allow you to change the day to start the week. Not all countries begin the working week on Monday and you might want to be able to look at a calendar that puts Saturday first and foremost. You can choose to start the week on Saturday, Sunday or Monday. You can also change the number of days visible in each view and add different calendars from around the world, such as Chinese calendars, a Hebrew calendar or a Persian calendar. Those dates appear in addition to the Julian calendar.
Events From Gmail
The next setting is particularly important. Google has the ability to scan incoming emails and add any events from Gmail it finds to your calendar automatically. It can be very useful. It means that when you order a ticket online or receive an emailed invitation to dinner when you check your calendar, you’ll find those events already entered—often with a neat design. But if you’re not aware that Google is reading your email in this way, it can be surprising. The settings allow you to turn the feature off.
Keyboard Shortcuts
Finally, you can enable keyboard shortcuts, a feature we’ll come to later in this guide.
Those are the settings that are available when you use your Google Calendar online. But what makes the calendar so useful is that all of these entries remain with you when you leave your desk and pick up your mobile phone or your tablet computer. Your laptop or your monitor might be easier to read and use but the calendar on your phone is always with you. The settings on your mobile device vary only slightly from those on your computer—but are much less clear.
Google Calendar App Settings
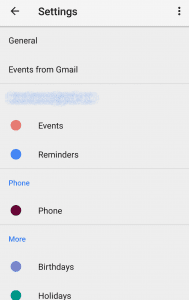
At the top of the list is a link to General settings may of which are the same as those on the website but a few of which are unique to the app.
General Settings
The first general settings are straightforward. You can change the day on which you start the week, choose to use the device’s time zone (a useful feature when you’re traveling) and you can enter a time zone manually.
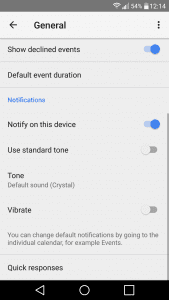

You can also choose to show week numbers and declined events, and change the default event duration from sixty minutes to one of five other options from fifteen minutes to two hours.
The next settings are more interesting. Notifications let you turn off notifications on the device or choose from a long list of different tones that will beep at you to remind you of the event, and toggle the vibrate settings.
It’s worth bearing in mind that while all calendars will have the same notification tone (you can’t create different sounds in the same way that you can create different ringtones) you can change the notification settings for each calendar. In Settings choose a calendar and choose one of the settings under Default notifications and Default notifications for all-day events.
Quick Responses
The last setting in this section is the most useful and probably the most overlooked. Quick responses let you choose one of four automated messages to send to guests of an event if you’re running late or can’t make it. Click on one of the responses and you’ll be able to edit the text. To use the response, tap or click an event, select the guests and choose the response. You can change the text then too.
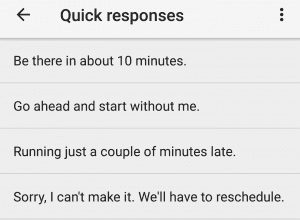

Return to the main settings menu and you’ll find more settings to play with, few of which are entirely self-explanatory.
Events From Gmail
Events from Gmail is clear enough. Touch that menu heading and you’ll be offered a switch that lets you toggle the ability to automatically insert details from events into the calendar just like on the website.
![]()
Events
The next option, Events, determines how events appear on your mobile calendar. You change the color of the block of time the event takes up on the calendar, and you can change the default notifications, adjusting the amount of time before the event when your phone gives you a ping. You can also add a second notification, and you can determine the settings for the notifications of events that take all day.
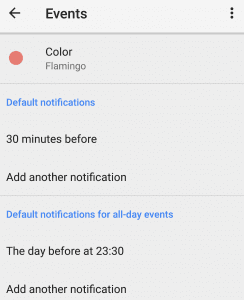

The next setting concerns the color of Reminders. These are entries that can only be made on Google’s calendar app; while you can see reminders on your desktop, and you can change their colors, cross them out when you complete them and delete them, you can’t create a reminder on your computer. You can only create an event.
We’ll explain how to create a reminder later, but they’re entries placed in the calendar that are renewed automatically every day until you mark them as done. They appear in the calendar with an icon in the form of a piece of string tied to a finger, and they’re meant to be at least mildly irritating.
Phone
The setting marked Phone couldn’t be less clear and Google provides no help in figuring out what it’s for. On many mobile phones, it’s also entirely irrelevant. These are entries that have been synced automatically with the device’s own calendar app. So if you’ve started using the calendar that came with your Samsung or Huawei device then switched to Google Calendar, you’ll find those entries already in place and you can change their notification settings and the color in which they’re highlighted.
More
Finally, under a heading imaginatively titled “More,” you can alter the settings of the data from any other calendars you might be using. Birthdays, for example, let you choose to add any birthdays listed in your contacts and from Your Circles on Google+. That’s worth bearing in mind. If you’ve set up circles in Google+ and someone has added their birthday information, you could well find that your calendar includes the birthdays of a bunch of people you barely know. Switch the setting to “Contacts” and you’ll keep your calendar personal.
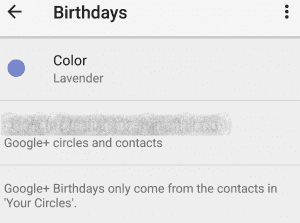

Those are the settings. They’re not all straightforward and they’re present on both the desktop and the mobile app. They’re also scattered throughout different parts of the app. Click the three dots after the list of each your calendars on the left side of your desktop screen, for example, and you’ll be offered a palette to change the colors of the events from each calendar as well as the settings for that calendar such as the source of birthday data.
The good news is that once your calendar is set up, you really shouldn’t need to touch the settings again. But if you find that you’re seeing the birthdays of people you don’t know or that the default duration of a meeting is a couple of hours, digging around in the settings will give you a better look for your calendar.
2. Creating Multiple Calendars
One of the most important features of Google Calendar is also the most confusingly named. Adding a calendar to your Google Calendar doesn’t actually add a new calendar. Instead, it takes data from a different calendar and places it in yours. Unlike importing calendar data though, that data is constantly updated. You can see other people’s events and, if you want, they can see yours. Each data source can be marked in a different color so that you can see where it’s from.
Despite its clumsy title, the feature is really useful. It means that you can add information from just about any calendar to your own calendar. You can import the dates of religious holidays, the fixtures of your favorite sports team, moon phases, NASA launch schedules and a host of other events—including calendars shared by other team members, relatives, and friends. The only limit is the space in your calendar itself.
How To Add A Friend’s Calendar
Adding a new calendar can only be performed on a computer; there is no option for adding a calendar to the Google Calendar app. But the option can be found on the site in two places
The most obvious place is on the left of the calendar where an option says, “Add a friend’s calendar.” Click the plus icon next to that option and you’ll find that it’s not only for adding a friend’s calendar.
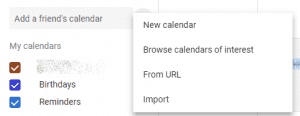

To add a friend’s calendar, you’ll need to start typing in the field that the text “Add a friend’s calendar” masks. When you do that, Google offers you a list of your contacts with people who have made their calendars public.
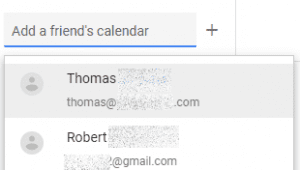

Click on one of those contacts, and you’ll be able to see their events listed on your calendar.
You can also try to add people whose calendars aren’t public. Type in the email address of someone in your contact list who doesn’t have a public calendar, and Google will notify you that you don’t have access to their calendar. It will also allow you to request access.
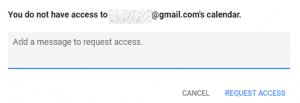

Send your friend a message and, if they approve, you’ll have added their schedule to your calendar.
Create A New Calendar
Being able to see a friend or partner’s schedule might be useful. Sharing your own schedule with others will also have a use. But you’ll probably want to hang on to your privacy and not share everything on your schedule. Your work colleagues might want to know the time of the staff meeting. They won’t want to know where you’re going for your anniversary dinner.
Google lets you create multiple levels for your calendar. Click the plus icon next to “Add a friend’s calendar,” and top of the list will be the option to add a new calendar.
Click that option and you’ll be able to create a new schedule on your calendar with a unique name. You’d enter those appointments in that calendar and when you share that calendar with others, they’d only see those events, and not your dental appointments or your vacation trips.
Add Calendars Of Interest
What Google calls “calendars of interest” is where things start to get really interesting. You can add a friend’s schedule to your calendar and you can create multiple schedules of your own to place in your calendar.
But you can also add a series of other calendars that have already been prepared. Click the option that says Browse calendars of interest and you’ll be taken to the Settings page and a list of different calendars. They’re organized into “holidays,” “sports” and “other” which is only the phases of the moon.


Add those schedules to your own, and you’ll see those holidays or those sports fixtures on your calendar. It’s very simple and a very effective way to create a calendar that works for you.
Add Calendars By URL
The selection of “calendars of interest” will cover the most important schedules that you’ll want to add to your calendar but there are plenty of others available online. You can add them by pasting in their URL.
Click the From URL option either from the plus icon next to the calendar or in the settings, and you’ll be offered a field in which you can enter the URL of a schedule available on the Internet.


The calendars need to be in iCal format. iCalShare, for example, offers thousands of free calendars covering topics that range from religious holidays to NASA launch schedules.
You can also choose to make that calendar publicly accessible. If you’re taking it from a public source, you won’t need to.
Sharing Your Own Calendar
The ability to share your calendar with others is one of the most important features of Google Calendar. The process is also a little fiddly. Again, it can only be performed on the calendar’s website.
Hover the cursor over the calendar you want to share and click the three dots that appear at the end of the line. On a calendar that you’ve created, you’ll be offered the option to Display this only, an option that removes all the other schedules from your calendar. You can also choose a prepared color for that calendar (or mix a color of your own)—and you can move to the Settings and sharing page.
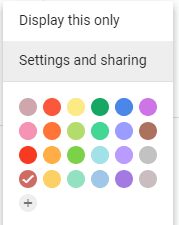

We’ve already seen how complex and comprehensive those settings can be so we can skip straight to the two settings that are relevant here.
Two Important Settings
There are two options for access permissions. The first is to make your calendar available to the public. That will allow everyone to see your calendar. It will even turn up in Google search results. You should think long and hard before choosing that option. It might be worth doing if you’ve created a calendar specifically to share the dates of your public events but for individuals, it’s best avoided if you want to safeguard your privacy.
If you do decide to make your calendar public, you can also get a shareable link that you can give to others so that they can find your calendar. Without clicking the checkbox that makes your calendar public, that URL will have no use.
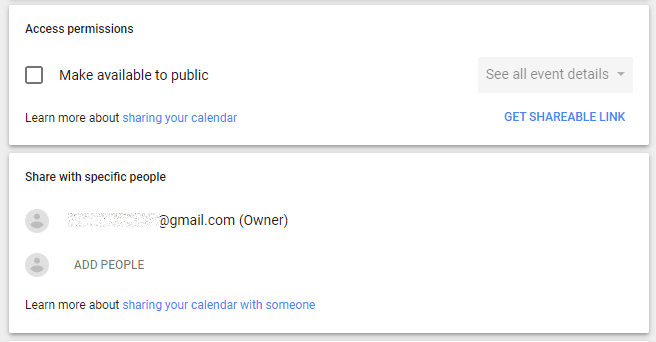

More helpful is the ability to share your calendar with specific people. Enter their email address and that person will have access to the data in that calendar: they’ll see the events that you’ve entered in your schedule on their own calendars.
Share Your Google Calendar With A Group
One of the least known functions of Google Calendar is both one of its most useful and one of the fiddliest to use. While communications platforms like WhatsApp allow groups of people to exchange messages, Google does allow groups to share a calendar. It’s a great way for voluntary organizations, church groups, schools and workplaces to share events.
There are a couple of ways to do it.
The easiest is to create a new calendar by pressing the plus icon next to “Add a friend’s calendar” and choosing New calendar. In the settings for that calendar, you can Share with specific people and add each group member’s email address individually. If you’re only adding a few people, it’s probably the best way to go.
Group Calendar Issues
But if you’ve created a large group, and especially if you want to do more than just share a calendar with that group, then it’s worth first creating a Google group. You can do that at groups.google.com. The fields are pretty self-explanatory and it won’t take you more than a few minutes to complete them.
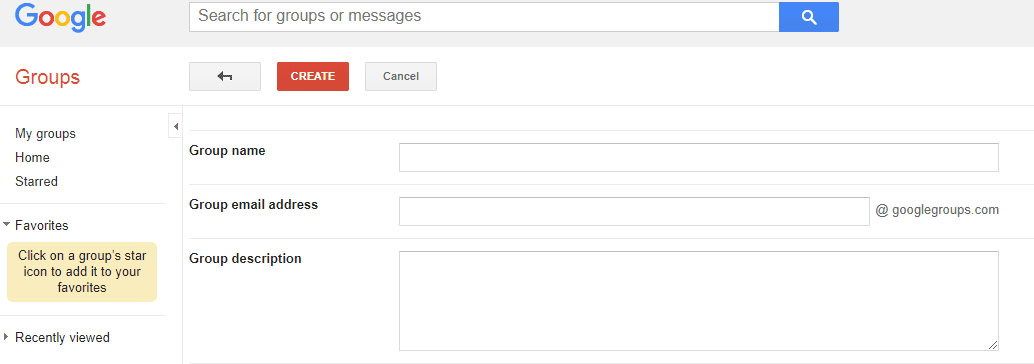

When you’re done and you’ve created the group, that group will have its own email address. It will look something like this: [name]@googlegroups.com. When you want to share a calendar that you’ve created to list that group’s events, instead of entering the email address of each member, you’ll be able to just enter the email address of the group. All the members of the group will have access to that calendar.
Bear in mind though that sharing the group to your calendar isn’t enough for the group’s members to see the group’s events immediately. Each member will receive first an email with a link that they need to click.
Prioritizing Your Calendars
Google and its calendar are smart, but they’re not geniuses. If you have multiple events on the same day, Google Calendar struggles to put them in the order you want to see.
The prioritization it uses starts logically. Events are presented in chronological order regardless of the schedule on which they appear. Therefore, if your personal calendar says that you have a staff meeting at 10 a.m. and your personal calendar lists a meal with your parents at 7 p.m., then the staff meeting will be listed first in your calendar and the dinner will be listed second.
But, what happens if you have more than one all-day event? Google can’t tell which one it should list first so it lists them in alphabetical order. If your personal calendar stated that you were spending the day with your family and your work calendar reminded you that you were out of touch with the office that day, you’d see whichever all-day event comes first in the alphabet.
Google’s order for all-day events is alpha-numeric. If you want to prioritize those all-day events, put a number before each of the event titles. It’s a bit of a clumsy workaround, but it works.


It would have been helpful if they had called those calendars “schedules” or something similar to distinguish them from the actual listing of days and weeks that you can see on the screen. But, the creation of different calendars will be part of your time management workflow.
3. Editing Your Calendar
Now, you’ve created your calendar. It’s set up the way you want it. You’ve added multiple different schedules. And, you’ve shared some of those schedules with friends, colleagues, or family. Now you get to place entries into that calendar. There are lots of different ways to do that—and more than one kind of entry.
How To Add An Event
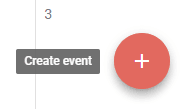

You can add events both from the calendar website and from the app. What you can do on each of those platforms though is slightly different.
There are two ways to create an event on the website.
You can click on the plus icon at the bottom right of the page to see the full event creation form.
Or you can click on a date which will generate a mini form inviting you to fill in the event’s most important details.
Add Event Mini Form
At the top of the form is the instruction to Add title and time.
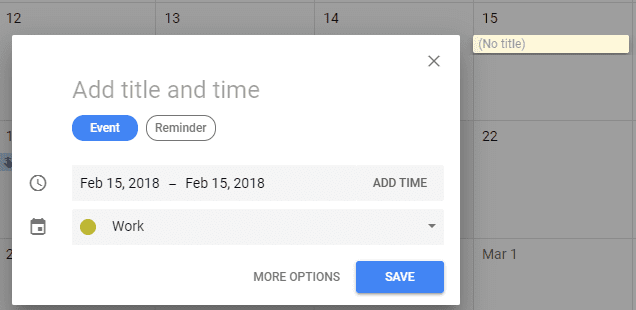

Actually, all you type there is the title. This is what you’ll see in the calendar—and remember that if you’re creating more than one all-day event on the same day, those titles will be arranged in alphabetical order.
Next, you can choose between creating an event or a reminder. We’ll come back to reminders later but the default setting is to create an event. You then get to enter a date. Because you clicked on a day to bring up the form, the default setting is that the event will last all day and will only take place on that day. Click on one of those dates though, and Google will offer a monthly schedule that allows you to enter different days. That single-day event can become a week-long happening such as a vacation or a conference.
Other Options
If it’s not taking place all day, you’ll also need to enter a start and end time by clicking Add Time.
Finally, if you’ve created multiple calendars, you can choose the calendar you want to use. That’s important and easy to overlook. Choose the wrong calendar and anyone you’re sharing that calendar with won’t be able to see the event. Click Save, and you’ll be done. The event will be on the calendar.
But you can do more. Press the More Options link next to the Save button and you’ll be taken to a pretty detailed form with a ton of different options. Most of them are pretty clear but some demand a little thought.
Add Event Complete Form
After the title and the time is an option to change the Time Zone.
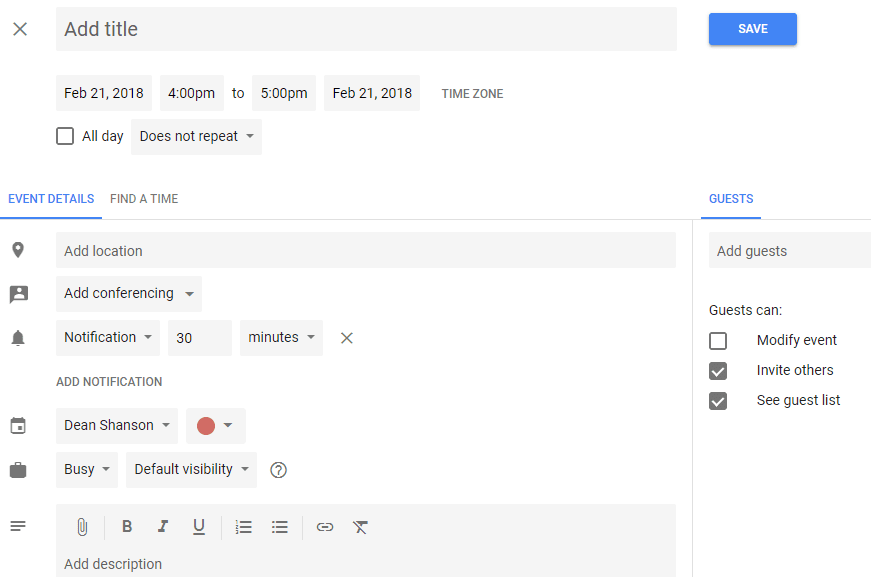

This isn’t something that you’re going to need very often but it might be useful if the event will take place in a different time zone. You can even start the event in one time zone and end it in another—useful if you’re manually entering the details of a flight or listing a party on an ocean-going yacht.
You can then mark the event as lasting all day, and you can make it a recurring event. Clicking Does not repeat lists a number of different ways to mark the event as recurring so that you don’t have to make a new entry every time. Google will offer to make the event daily, weekly, monthly, annually, every weekday or weekend, or just let you figure it out for yourself. For regular events such as weekly staff meetings, it’s a very useful tool.
Event Details
The next section is more complicated. This is where you can enter the event details. You don’t have to do this stuff, but it can be useful, especially if you’re inviting other people to take part.
Start to add a location and Google will complete the address for you. That’s not just a convenience. It also turns the location into a link that a guest can click to see on Google Maps. The more accurate you make that location information, the easier it will be for guests to find where they’re going.
If you’ve changed the settings to remove conferencing you can click Add conferencing to bring back Google Hangouts. You probably won’t want to, but you can’t remove this option from the form.
Other Event Detail Options
The next option is the type of notification you can receive. This is more complicated than it sounds. You can choose to receive the notification by email or you can receive it as a notification in your browser or on your mobile device. You can set how long before the event you receive that notification in minutes, hours, days or weeks, and you can add more notifications just in case you—or your guests—might forget. If you’re setting up an important event such as a wedding, for example, those repeat notifications sent a long way out can be useful.
You can then change the calendar on which the event will be posted, and you can change the color of the event. That can be useful too. In general, event colors will match the color you’ve set for the calendar but if you want a particular event to stand out, you can also give it a special color.
The next option relates to privacy. The event will have Default visibility. Anyone you’ve shared your calendar with will be able to see all the event details. They’ll also be able to see those details if you change the visibility to public. If you set the event to private, then even people who can usually see your events won’t be able to see the details of this one. Instead, they’ll see that you’re either busy or available depending on the setting you choose.
Finally, in this section, you can also include a description of the event. For most events, the title is likely to be sufficient. But adding some extra detail here—such as dress code or meeting topic—can be useful. You can even add attachments and links which makes the description feature particularly valuable when arranging a business meeting. Upload the agenda, for example, and people will know what to expect.
More Ways to Create Events
An area on the right of the screen lets you add guests so that they can see it on their own calendars, and allow them to engage with the event in different ways. You can let them change the event, invite other people to take part, and allow them to see everyone else who has been invited. Of those three, you’ll probably only want to check the last box.
There are a couple more things that you can do when you’re creating an event on Google Calendar.
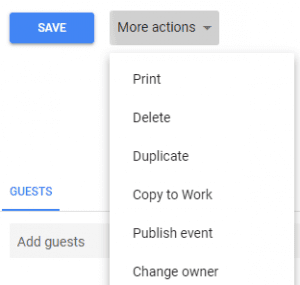
At the top of the page, next to the Save button, is a drop-down menu called More actions. Pull that down, and you’ll be offered a list of actions that you can perform on the event you’ve created.

More Things to Know About Events
Most of those options are fairly clear. You can Print your event and Delete it from your calendar. You can Duplicate it so that you can mark the same event at a different time or on a different day. And you can copy the event to a different schedule, such as your work calendar or your personal calendar. But you can also Publish the event, which gives you a URL that you can share with people, and you can Change the owner, which invites one of your contacts to take over management of the event’s scheduling.
The last feature of event creation is the coolest. By the Event details link at top of the form is a second link that invites you to Find A Time.
Google doesn’t do this automatically. Instead, it lets you browse through a calendar on which booked times have already been marked. Instead of asking everyone when they can meet, you’ll be able to see the day for yourself and pick a time. If you want Google to do the searching for you, you’ll need to click the link on the right that says Suggested times. That will offer a list of times when all the guests are available.
How To Add An Event From An App
Adding a detailed event from the website might well be the most convenient if you have a lot of text to create. If you’re looking to add an event quickly, then using your mobile device might be more convenient. Click the plus icon in the bottom right-hand corner and you’ll be invited to create your event.
You won’t only be invited to create an event though. You’ll also be invited to create a goal and a reminder. We’ll come back to those but on an app an event is the last item on the list—though it is also the function with the biggest icon and the only icon in red.
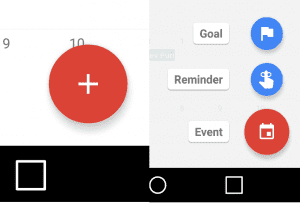

Tap the Event icon and you’ll be taken to a form similar to the one on the website. One significant difference is that attachments can only be made from Google Drive. If you have a document on your mobile phone that you want to share, then you’ll need to upload it to Google Drive first.
You can also add an event by tapping a date—and delete one by sliding the event to the right.
How To Add An Event From Gmail
All of the event functions we’ve looked at so far have been pretty straightforward. Adding events, whether you’re using a website or an app, shouldn’t take more than a few minutes. But that’s still more minutes than you might want to spend, and if you’re adding something more detailed, such as a flight reservation, then you might want a method that’s less fiddly and less likely to leave out some important detail.
One of the settings in Google calendar is called Events from Gmail. You can check the box marked Add automatically or you can leave it unchecked. Check that box and any event that arrives in your Gmail inbox will be added automatically to your Google Calendar. Google will note the date and pull out any other relevant details, including some that you might not have thought to add yourself.
Booking a Flight
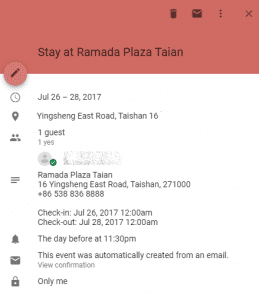
For example, if you’ve booked a flight online, as soon as you receive the confirmation email from the booking site, you’ll see an entry in your calendar that tells you where you’re going, the flight number, the date and time, including the arrival time, the confirmation number, and the names of anyone flying with you—but only if they’ve shared their calendar. (You might also see a small icon that looks like a suitcase with the word “free” next to it. Sadly, that doesn’t mean that the baggage is free. It means that you’re listed on your calendar as free). Hotel reservations might include the check-in and check-out times.
If the airline changes the departure time or the restaurant changes the reservation time and notifies you by email,Google Calendar will update those details.

Event Notifications
Notification of events added from Gmail will be based on your default settings in Google Calendar, so it is worth keeping an eye on the time you’re giving yourself. You might end up with an hour’s reminder to get to the airport!
Events added from Gmail are also set automatically to private. Even if you’ve shared your calendar, only you will be able to see information that Google has taken from your email account. To allow people who share your calendar to see your flights, dinner reservations, and hotel books, you’ll need to go into Settings and change the visibility next to Events from Gmail.
Private and Public Options
You’ll be able to keep that event private so that only people with permission to make changes to your calendar can see the event; everyone else will just see that you’re “busy.”
You can make the event match your Calendar default so that people who can usually see the events on your calendar will be able to see the name and time of an event drawn from Gmail but only people who can make changes to your calendar will be able to see the rest of the event details.
And, you can choose to make an individual event public. You will only see those visibility options if you’re sharing your calendar. However, it doesn’t always work. Google will only take details from businesses involved in flights, hotels, restaurants and ticketed events such as concerts and movies. Those emails must also come directly from the website itself. Google won’t take details from emails that have been forwarded, sent to a mailing list, or redirected from a different email account.
How To Add An Event From Google
Adding events automatically from Gmail is very cool, but Google can do even more. If you’re logged in to your Google account, you can even add an event to your calendar from Google’s search engine. Open Google.com, type the date and time of an appointment, and Google will offer you the opportunity to add it to your calendar.
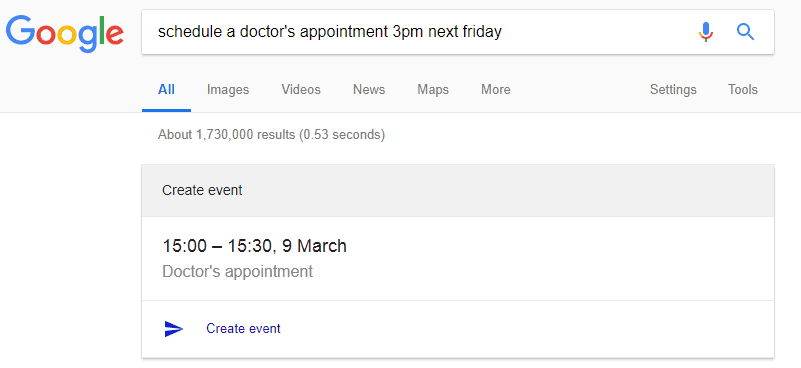

You might have to play with the phrasing. “Schedule” works and so does “book.” And you’ll need to mention both the time and the day. Click the Create event link and the event will be added to your calendar. You’ll then be offered the chance to edit it.
It’s difficult to see when you would want to use this option. Tapping on the screen a few times on the calendar website or app is likely to be faster and more convenient than writing in the search engine. But it’s still a neat trick.
How To Add An Event From Google Assistant
More useful is the ability to add an event to your calendar using your voice. Bring up Google Assistant on your mobile device and you can instruct it to add an event to your calendar. Tell it to “Schedule a doctor’s appointment for next Friday at 3pm” for example, and it will create the entry then wait for your confirmation before placing it on your calendar.
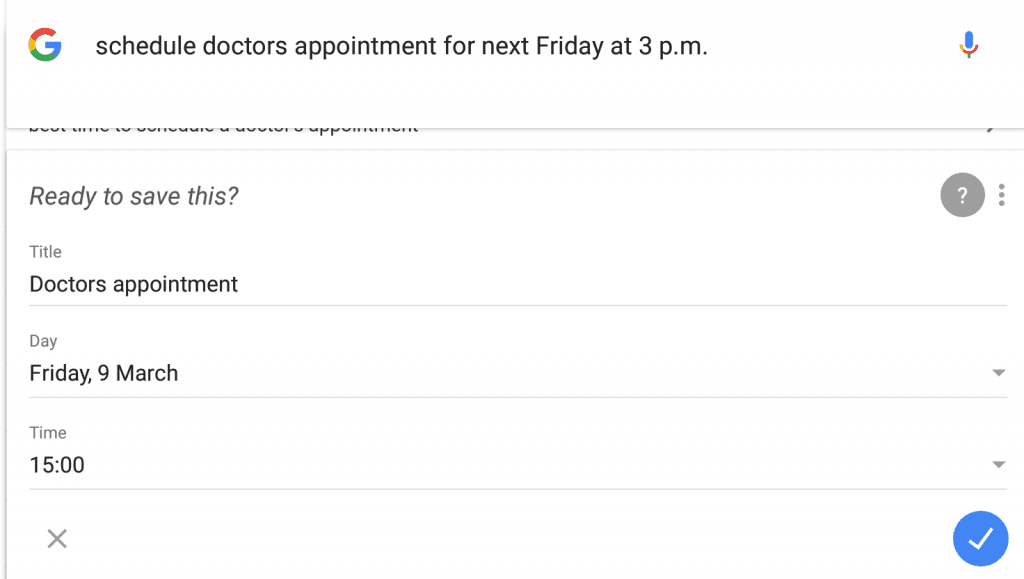

Of course, you can do the same thing using the Assistant in Google Home. Fire up Google’s speaker and you’ll be able to add events to your calendar without touching a screen.
How To Create A Reminder
Press the plus icon on Google Calendar app and get three options. These include the option to set a goal, create a reminder, and create an event. Neither of those options is offered when you click the same icon on the computer but one of them is available. You won’t see it when you click the icon but if you click an empty spot in your schedule, the mini-form that Google offers allows you to create both events and reminders.
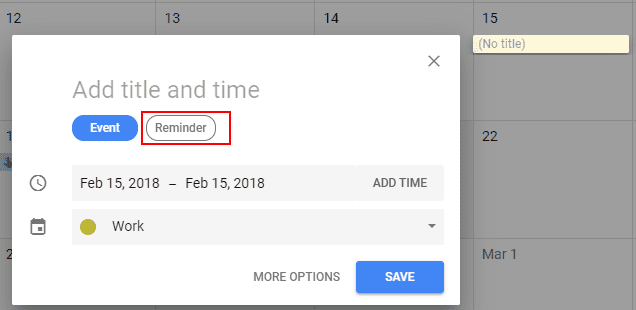

Click that Reminder button and you’ll given a form that invites you to enter a title, change the start date, indicate whether you want the reminder to repeat, and whether you want the reminder to take up the whole day or whether you want it to trigger a notification at a particular time.
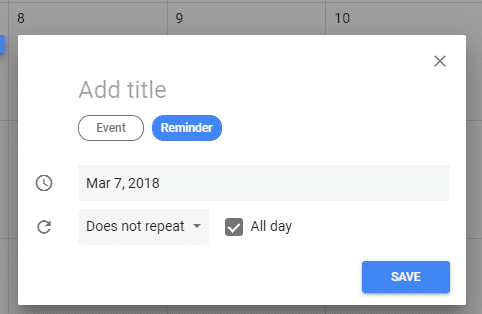

A Reminder and an Event
There are two differences between creating a reminder and creating an event.
First, a reminder appears on your calendar. It’s a little icon that has a finger with a piece of string tied around it. Second, if you don’t delete the reminder or mark it as “done” on your calendar, it will still appear the next day.
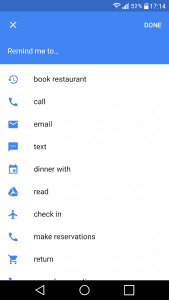
While you can create a reminder on your computer, it’s much more convenient to create one on your mobile device. Press the plus icon and then the Reminder option. This offers a list of automated reminders. These reminders include booking a restaurant through making a phone call, sending an email, returning goods and canceling a reservation. Each offers an automated list.
In theory, you should be able to create a reminder with just a few taps and without ever needing to touch the keyboard.

It’s worth remembering though that the role of a reminder in a calendar is to bring back to mind something you’ve forgotten… and to do it in time.
How To Set A Goal in Google Calendar
We’ve saved setting a goal till the end of this section because it’s so neat. All the features we’ve seen until now have been pretty simple and they’ve demanded work from you.
You need to enter your own event details and set your own reminders. Sure, Google can take details from your Gmail. However, some other company still needs to put those details in the message or you need to do it when you make your booking.
You can only set a goal on the app. Click the plus icon in the corner and choose the first option. Google will then offer a list of different goals that you might want to achieve and that demand time. They include exercise, building a skill such as learning a language, meeting friends, setting aside time for yourself, and organizing your life.
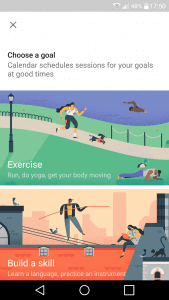

Goal-setting Features
Choose one and Google will offer a list of options. You can enter your own custom goal. Choose to learn a skill, for example, and Google will ask whether you want to learn a language, learn to code, practice an instrument or make art. Pick one of them and Google will offer another list, such as a list of languages, then ask you how often you want to practice, for how long and what time of day.
Google won’t ask you which time you want to conjugate Spanish verbs or practice the violin. It will ask you whether you want to do it in the morning, afternoon, evening or any time. If something comes up, and you’re unable to make the time that Google has found, your calendar will automatically look for a different time and reschedule. That can happen if you enter the second event at the same time as the goal or if you hit the Defer button when you receive the notification.
You can also edit the goal by tapping the edit icon. If you decide to complete a session early, you can bring it up on the calendar and hit the Did it button. When you delete a session, you can choose between deleting just that single session or all following sessions (and stop scheduling).
AI-Enabled
It’s a very neat feature but what’s really clever about it is that it encourages you to use your calendar. Also, the calendar learns. The feature uses a form of artificial intelligence to better understand your schedule. First, it searches your calendar data to find a time that suits you, removing the excuse that you don’t have time to work out or practice your Spanish verbs. The more you use your calendar, the better the chances that Google will offer you a time that’s genuinely available.
As you press “Defer” or edit the session to move it to a different time, Google will better understand your lifestyle and adjust accordingly.
How To Add An Event With A Key Press
Hit the Q key and Google Calendar will present the event mini-form allowing you to enter an event for the current day. It’s fast and easy… as long as you want to add an event on that day.
4. Viewing Your Calendar
The more you use Google Calendar, the more useful it becomes. However, users will only open their calendars if they can see at a glance the information they need. Google offers a number of ways to change the view of the calendar.
Give Your Calendar The Long View… Or The Short View
On the Google Calendar website, the view setting is at the top of the page. The monthly view appears like this:
![]()
![]()
Click on that “today” button though and all you’ll see is a floating caption showing the date. Next, select the arrows and you can go backward or forward a month at a time. After, choose the month and the year. Nothing happens at all. It’s not the best usability mix.
To change the view of the calendar on your computer, you’ll need to open the drop-down menu at the top right.
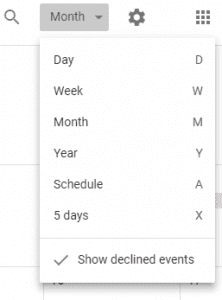
Those options are pretty self-explanatory. The Schedule shows only a list of the events that you’ve placed on your calendar. One useful trick here is the ability to see multiple calendars in a single view. If you have access to the calendars of friends or colleagues, when you switch to Day view and bring up their calendars, you can see their days side by side.
Change Your Calendar View With Your Sidebar
There are a couple more neat tricks that you can do to improve the appearance of Google Calendar on a website.
On the left of the screen on the Google Calendar website is a mini-monthly view. Click a date on that calendar and drag the cursor, and the main screen will show just those dates.
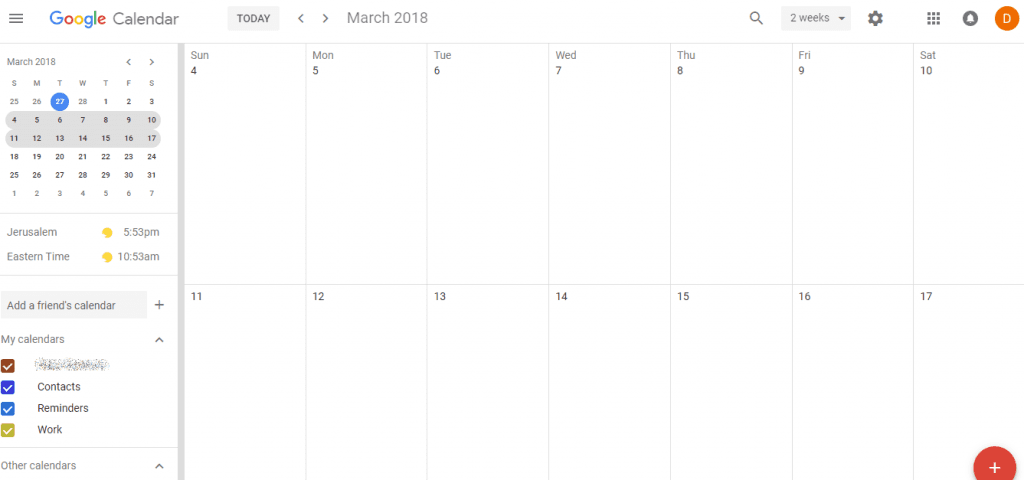
It’s an easy way to see adjust the view without fiddling with the drop-down menu. What happens next though is a little less obvious. The view that you’ve created now becomes your default view for your next click.
You can also remove this sidebar entirely. In the top left corner is an icon with three horizontal lines. Click that and the whole left sidebar disappears. You’ll lose the mini-monthly view, the world clocks, your list of calendars and an easy way to add a friend’s calendar to your own. But, you’ll get a full-screen calendar with no interruptions.
On a mobile device, pressing that icon has a very different effect. It’s the button that brings up the list of views. Those views start with Schedule this time, then run from a single day to three days, a week and a month.
Travel The Year With Your Keyboard
You can also view different parts of the year with single key presses. Pressing K or P will move you back through the year. Keys J or N will move you forward. Pressing T will take you back to the current view of the year.
You can also bring up the search function by pressing /.
Want To View Your Google Calendar Offline? Use The App
Old-fashioned paper diaries work anywhere. That used to be true of Google Calendar too. When Google redesigned its Calendar in October 2017, that option was missing from the new version. Mobile does give you some options.
Open your Calendar app without an Internet connection and you’ll still be able to flick through your events and your days. You’ll be able to add events to your Calendar and even set goals. As soon as you go online again, Google will update your online Calendar so that you can see the events you’ve added offline across different platforms, and Google will then calculate the schedule for your goals.
But, this doesn’t work on the Google Calendar website. Try to add an event to the website without an Internet connection, and you’ll be able to bring up the event form and you’ll be able to enter the details. You won’t see the results until you’re back online. Use the app offline and wait till you’re back online to use the website.
Change Your Calendar’s Look And Feel
Finally, Google Calendar doesn’t give you too many ways to change the design of the calendar. While you can adjust the colors for each event, you can’t easily change the background image or insert pictures into the time slots themselves.
In fact, Google gives you just two options. Click the Settings icon at the top right of the website. This gets you to Density and color.
Choose that option and you’ll get exactly two options for each. Modern (with white text) makes the text that appears on the colored event background white. The Classic color set uses black text. Every other aspect of the calendar looks exactly the same.
More Format Features
You can also choose to make the design Responsive or Compact. Add more than four or five items to a day, and when you fill the space in the calendar, Google will add a link to see more. Click that link and you’ll get a pop-up that shows all the events scheduled for that period. Some users have found that the Compact view squeezes more items into the same space. Therefore, you can see more of what’s happening at a glance. In practice, it makes little difference.
Adjusting the view of your Google Calendar can be a little fiddly. The options aren’t as obvious. However, there are plenty of options to see your Calendar in exactly the way you want.
5. Extend Google Calendar With Some Extra Software
Google Calendar is oddly complex for a tool that has only a handful of features. But it could be even more complex. Compared to other time management tools Google Calendar still looks somewhat underdeveloped, despite its latest facelift. Before the October 2017 revamp, that would have meant using some of the features available in Labs, Google’s testbed. Since the update, those features are not accessible. I however find it a little easier to use over Yahoo Calendar or Office 365 Calendar.
Google Calendar’s Professional G Suite Names Rooms
Google offers free products and sells the data collected from those products. However, it also sells some of its services to businesses, including its Calendar. Companies that sign up for G Suite by Google Cloud pay from $5 to $25 per user per month. In return, they get an extended version of many of the free services. Additionally, they receive greater storage, an ad-free experience, and data loss prevention for Gmail and Drive. Plus, they have access to “a vault for eDiscovery and archiving.”
Case Study Example
The big difference in Calendar for Google’s paying customers is the ability to create rooms and describe resources. For example, a company with offices in London, Paris, and San Francisco could list available meeting rooms available at each. They could assign video conferencing facilities, whiteboards, and other useful resources to each.
For large firms with multiple meeting rooms, it’s a very useful tool, but it does take some setting up. Google says the feature sets the foundation for “future intelligent room booking.” It hasn’t said how that’s going to work. However, it’s something to watch out for.
Jason Savard’s Checker Plus for Google Calendar Gives Quick Access And Pretty Backgrounds
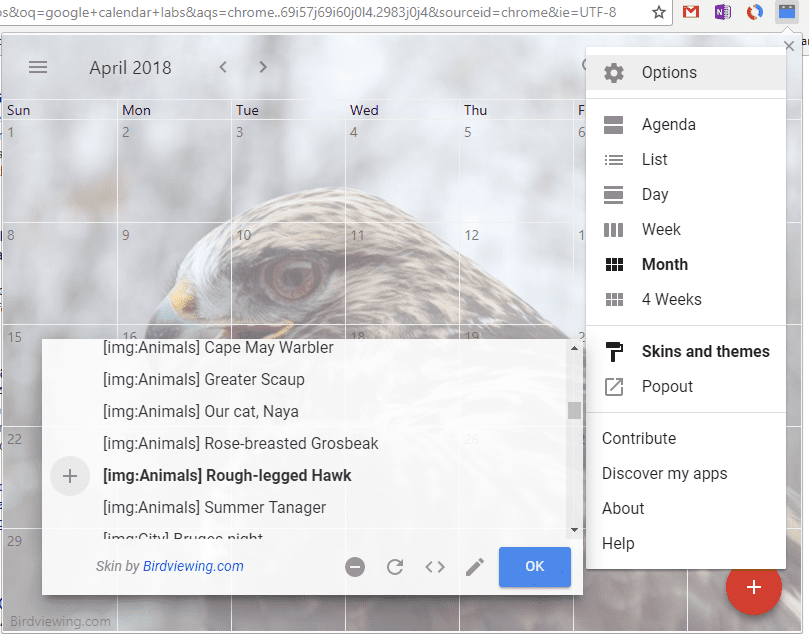
Jason Savard makes Chrome extensions. This includes a series of Checker Plus tools that make mini versions of Google services available from a browser button. It doesn’t offer a huge number of advantages. You can enjoy easier access when using a computer. The range of notifications is longer. It includes a voice notification that reads out the title of the event. The best feature is the ability to place a background image under your calendar. It only works inside the extension and unlocks once you’ve made a contribution. However, these features show how much more Google could do with its calendar.

Meetric
Meetric is another great extension for Google Chrome. You are able to capture meeting notes directly inside the Google Calendar app itself. When you click on the event, you’ll be able to add and share notes from any event you find in your calendar.
Event Merge
Many people have personal calendars, work calendars, or a combination of the two. Because of this, it’s very easy to get confused on have the same events in multiple calendars. This is where Event Merge comes in. Event Merge combines all of the separate events into one event, and helps you see where each event is coming from.
Conclusion
Google has built a reputation for building tools that are both hugely valuable to users and free to use. The much anticipated revamp of the calendar in October 2017 brought a cleaner, more modern look. It incorporated some of the features that users had experimented with in Labs. However, some of the usability, especially on the website, is unclear. And, the lack of personalization feels like a major loss. In the end, Google Calendars come down to sharing, events and their details, reminders, and goals.
In 2023, Google Calendar still feels like a work in progress. But, it’s already both complex and essential. And, this guide to Google Calendar will help you leverage the best features.
Updated June 20, 2023


John Rampton
John’s goal in life is to make people’s lives much more productive. Upping productivity allows us to spend more time doing the things we enjoy most. John was recently recognized by Entrepreneur Magazine as being one of the top marketers in the World. John is co-founder and CEO of Calendar.