In a post on Woven’s website, Tim Campos recalls the first time he was called to meet Mark Zuckerberg. Campos had recently been appointed Facebook’s CIO and was bursting with new ideas. He was looking forward to meeting the company’s founder and suggesting ways the company could improve. Before he had even walked into the office, though, he was collared by Zuckerberg’s admin assistant. She barraged him with complaints about Facebook’s internal calendar system.
“Fix this,” she warned. “Or else.”
In this guide, we’re going to look at how to use Woven — and how to make the most of it.
Facebook had been struggling with its use of Microsoft Exchange Calendar, and the problem had grown worse as the company had scaled. Over the next six months, every conversation that Campos had at Facebook started with a story about the calendar’s failure.
The company prioritized the problem. “If we can’t even keep our calendar stable, what does that say about other mission-critical systems within the company?” Campos wrote.
As he looked at the flaws in Microsoft Exchange Calendar, Campos started to think about how people schedule time. He wondered whether reinventing the way that calendars are built would affect the way people live. By the time he was finished, he hadn’t just solved Facebook’s problem; he had also created an entirely new way of managing time.
That application is called Woven, and it’s now available for anyone to use — even if you’re not scheduling meetings with Mark Zuckerberg.
At first sight, Woven looks like any other calendar application: Google Calendar, Apple Calendar, Calendar, and even Microsoft Exchange calendar. But the calendar does have several unique features. Campos claims that the app pulls together every stage of the calendar lifecycle: planning, scheduling, preparation, meeting, and even follow-up. Its use of AI and a particular calendar graph engine can create what Woven calls “weaves.” Weaves is a suggestion for how a user might want to spend their time.
1. Getting Started with Woven
Sign up with Woven, and the application will immediately start walking you through the initial set up. If you’ve registered your Google account, for example, you’ll be asked which of the schedules on your Google Calendar you wish to use.
Or instead, it will ask you to “select the calendars whose events you attend,” which is a smarter way to put it.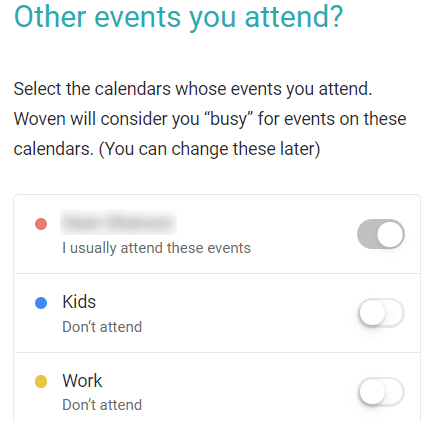
Digital calendars have layers of schedules, but not all of them are useful in the same way.
You might have set up a schedule for your children, for example, so that you can keep track of their school trips and their exams, but you don’t have to attend those events yourself. You want to know when they are, but you can still schedule your own events at those times. Woven understands that time usage. It just wants to know when it can add new events to your calendar.
Create Your First Woven Template
The next step is neat too. Woven allows users to create calendar event templates. These are predetermined types of events that make scheduling simple. Instead of having to fill in all the details of the planning meeting every time you hold it, for example, you can pull up that template and change the dates. The location, the description, and the duration will all be pre-determined.
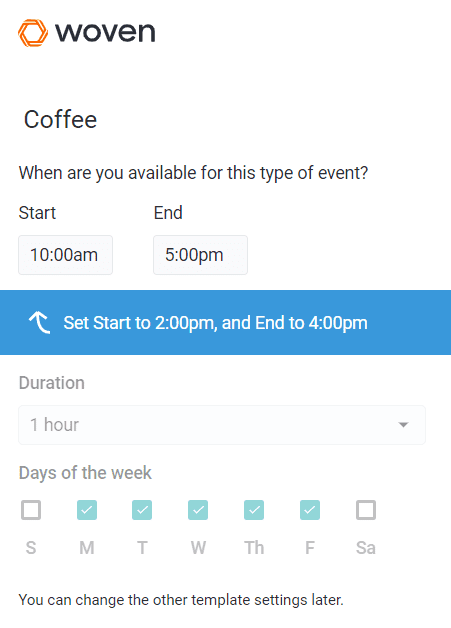
When you register with Woven, the platform throws you right in by asking you to create a template for a coffee meeting.
You might never actually use this template, but having been forced to create one before you can begin using Woven, you will be ready to create more — and you’ll be most inclined to start using Woven. The platform then presents you with your schedule, with the events from your integrated digital calendar — whether that’s Google Calendar or any other option –already in place.
The next step is to make the schedule look pretty.
Adjusting Woven’s Settings
Woven’s menu appears on the left of the screen. Scroll down and select the gear icon. You’ll receive a list of setting options, with the Appearance section already open.
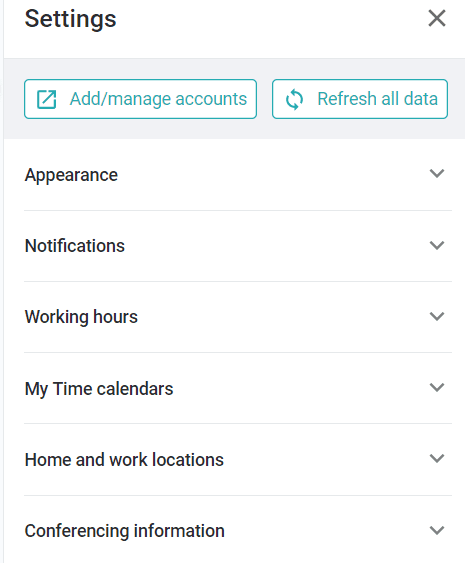
Woven doesn’t provide a lot of options here. (They appear to have put more efforts into creating templates than into preparing pretty designs). You can choose two themes: light; or dark, which is still in beta. You can decide to start the week on Saturday, Sunday, or Monday, and you can pick a primary or secondary time zone.
That’s all you can do. You can’t change the colors or the fonts here.
Notifications
The next section is Notifications, which does give you more options. Bear in mind that any announcements that Woven sends you will be in addition to the information that you might be receiving on your original calendar. If you’re using Woven as a better way to interact with your Google Calendar, for example, then choosing to receive notifications from Woven as well will double the number of those messages.
You can choose to receive notifications by email, by desktop, and on mobile devices for new invitations and changes to events. You can also decide whether you want to receive those notifications. You’ll say to only contact you in the event of a conflict, for every invitation or change, or none at all.
If you’re already receiving notifications from your primary calendar, then you may as well choose “none” here. Receiving double notifications is only going to become annoying.
This is also where you set your reminders. Woven’s default is to send a notification thirty minutes before the event, but there are eight options altogether, from when the event starts to a week before the event. You can also add another reminder, and you can create reminders for all-day events. (The default is not to remind you if you’re going to be spending an entire day somewhere.)
Availability Sharing
The final part of this section is less clear. Availability sharing comes with two options. They’re both checked by default.
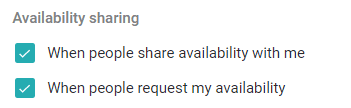
The first is to share your availability with people who share their availability with you. The second is to share your availability when people request yours.
Sharing your availability is essential. One of the most vital functions of a digital calendar is the ability of other people to schedule events across more than one calendar easily. That means they need to be able to see which hours are taken and which are free.
Woven doesn’t let you share your calendar with others. Unless you give them your username and password, your admin assistant or spouse won’t be able to see which events are booked into your calendar. Anyone sharing your availability will only be able to see whether an hour is available or not.
Even that simplest level of privacy, though, still requires a certain amount of intrusiveness. You might not want anyone to be able to see your schedule. The default, though, is that anyone can see your schedule if they show you theirs or you ask to view it.
If you’re okay with that, you can leave those boxes checked. But if you want to approve availability sharing before it happens, click the boxes to remove the checkmarks.
Working Hours
Setting the working hours doesn’t change the view of your calendar. Other digital calendars can focus on your working hours, but the calendar shown by Woven runs from midnight to midnight. To see your current hour (which is helpfully shown by a red line that runs across the page), you’ll need to scroll up or down the page.
Setting the working hours determines your default availability for new events, links, and templates. You can change those hours when you create a template, but it is worth bearing in mind that when you do create a new template, these working hours will be the default. Enter the days and hours when you usually work, then remember to adjust them if you’re willing to accept events outside those hours.
My Time Calendars
You’ll already have come across the feature displayed in My Time Calendars. It allows you to choose the schedules you’ve created on your main digital calendar. So if you decided to sync just one of your calendars when you set up your Woven account, but you’re now finding that you have to go back to Google to check your schedule before you accept an event, this the place to bring in all your other calendar. The more calendars you include, the higher the chances that you will receive an event clash notification if someone schedules two events at the same time.
Home and Work Locations
One feature that Woven does particularly well is to combine the calendar with a map.
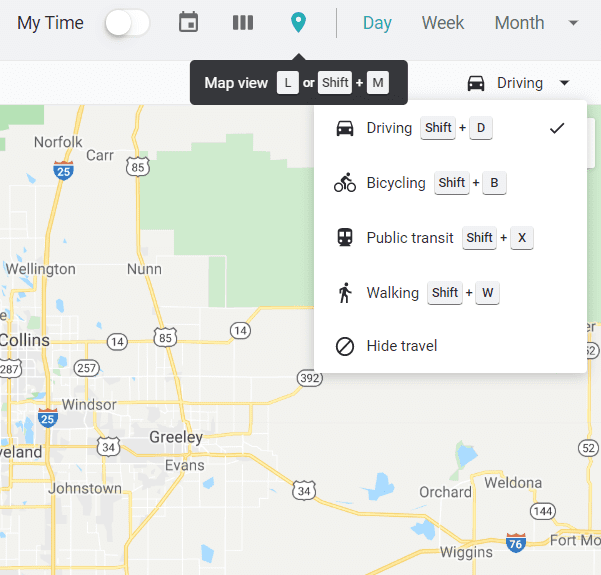
Click the location icon above the calendar, and part of the schedule will give way to Google Maps. You’ll be able to see where your events are taking place, with the routes and travel time already calculated. Click the Driving icon on the top right, and you’ll be able to shift between various travel methods to reach those events.
This part of the Settings lets you include your home address and your work address so that Woven can figure out your daily travel time. The question looks intrusive, but if you’re using anything Google, including an Android phone, Google will already have this information anyway. You might not want to give it to Woven as well, but you’ll be losing a valuable feature.
Conferencing Information
Finally, if you’re going to be taking part in conference calls, then including your link or phone number or adding any other conferencing information here will make scheduling much more comfortable.
Setting the Layout of Your Woven Calendar
Start with the settings so that your Woven calendar is arranged the way you like. Before you’re ready to begin creating events and sharing your schedule, though, you should also organize the appearance of your calendar.
Above the calendar are several buttons that change the way your schedule looks.
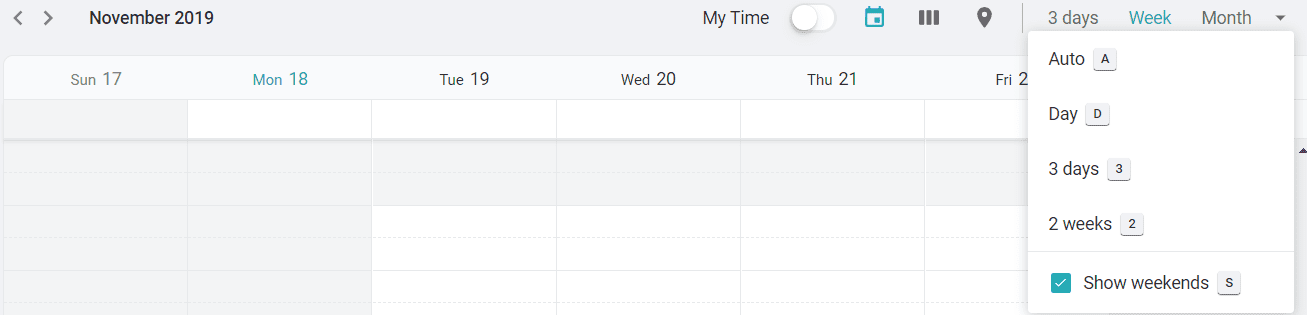
The three at the far right appear to be relatively straightforward. Click the links marked “Month,” “Week,” or “3 Days,” and the calendar will change to show that time. But the arrow at the end opens up even more options. They allow the calendar to stretch automatically according to space on the screen. They let you focus on a day, on three days, or two weeks. More importantly, they can cut out the weekends—a useful feature if you’re only using your Woven calendar for work.
It’s an interesting usability choice. Woven could have put all those options in a dropdown menu under a single link, but the company assumes that users will want to flick quickly between three days, a week, and a month. Expect to be doing that too.
The next feature from the right opens the map, and the three vertical lines next to it arrange the Woven calendar according to your different schedules. They create separate columns for each of your schedules. Finally, in this section is a button that brings back the “standard view.”
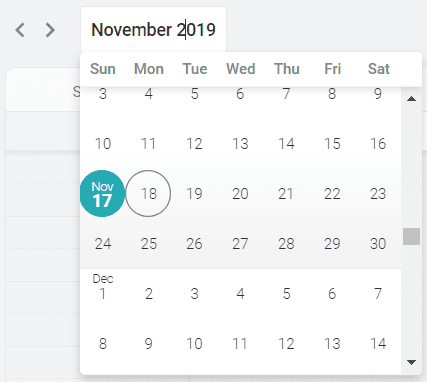
On the other side of the screen is the name of the month. Click that, and you can see the entire month, and select individual days to focus on. Arrows next to the title let you pass backward and forwards through the year.
The navigation on Woven is nicely done. The features are also familiar. But there’s one more feature on this menu that doesn’t appear on other calendar apps.
My Time
Woven also offers a switch that lets users toggle “My Time.”
Woven puts calendars into two categories: those it puts under “My Time”; and those it lists under “Other Calendars.” The company explains that people have access to all sorts of calendars other than their own. They might see their partner’s schedules, co-worker schedules, or shared family calendars. And they’ll have their own work and personal calendars too.
Calendars listed under “My Time” have additional functions:
- Scheduling Conflicts — Woven won’t tell you if an event on two calendars listed under “Other calendars” is listed at the same time. So if a co-worker has a Scrum meeting at 9 am, and your brother has a breakfast scheduled at the same time Woven won’t inform you that there’s a clash. There’s no clash with your schedule. Woven will tell you, though, if an event clashes with an event on your “My Time” calendars.
- Availability Sharing — When you share your calendar with someone else, they only receive information about your “My Time” calendars. They won’t see what’s in those calendars, but they do see whether or not you’re busy, but only according to the events in your “My Time” calendars. If you also have a national holiday calendar that’s not listed under “My Time,” those events won’t be shared.
- Notifications — On the left of the screen, Woven has an Updates section that lists notifications related to events. It will only show notifications related to activities on your “My Time” calendars.
Those features choose calendars to put in under My Time is critical. Put too many calendars here, and you’ll struggle to book appointments and receive lots of conflict notifications. Put too few, and you’ll get clashes.
It also makes the switch at the top of the page is significant. Toggling that switch removes all the other calendars from the screen, making it easy to see only the events that directly affect you. It’s a handy way to clear up the screen.
You can add and remove calendars from the “My Time” list on the left of the screen.
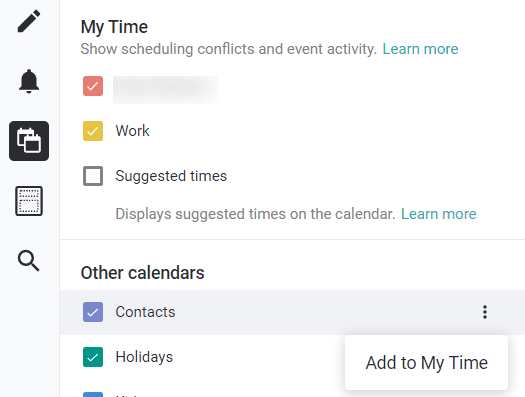
Select the icon beneath the Updates bell, and you’ll see the calendars listed under “My Time” and the “Other calendars” listed below. To add a calendar to your “My Time” list, hover over the name of the calendar and click the three dots on the right. You will then be able to choose “Add to My Time.”
To remove a calendar from your “My Time” list, hover over the calendars in that list, select the three dots on the right, and choose “Remove from My Time.”
Also, under the list of your “My Time” calendars is the option to see “Suggested times.” These are always listed under “My Time,” and they show the times you’ve suggested to other people when booking events. Toggling them on when selecting times ensures that you don’t book the same hour twice.
Creating Events, Links, Polls, and Templates
The vertical menu on the left of the screen allows you to control your calendar. The first icon, a plus button, lets you create. It has four options: Events, Links, Polls, and Templates.
New Events
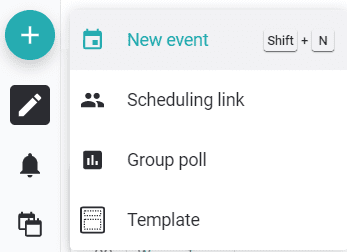
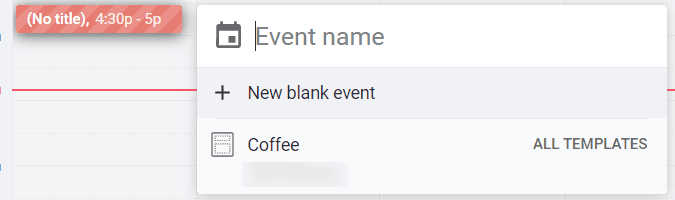
The first type of content you can create is events. Click the “New event” option (or press Shift + N), and you’ll be offered a choice of three steps that you can take next.
Each of the options has been designed to make creating events as easy as possible. Start typing the name of the event, and Woven will search through your calendar and offer similar events that you’ve created in the past. Start typing “meeting,” for example, and Woven will provide you with a list of different meeting events that you’ve created before.
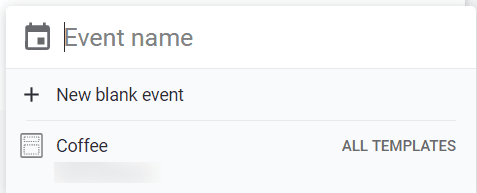
The third option is to choose a template. Because you created one when you joined Woven, you’ll have one template here, waiting to be used.
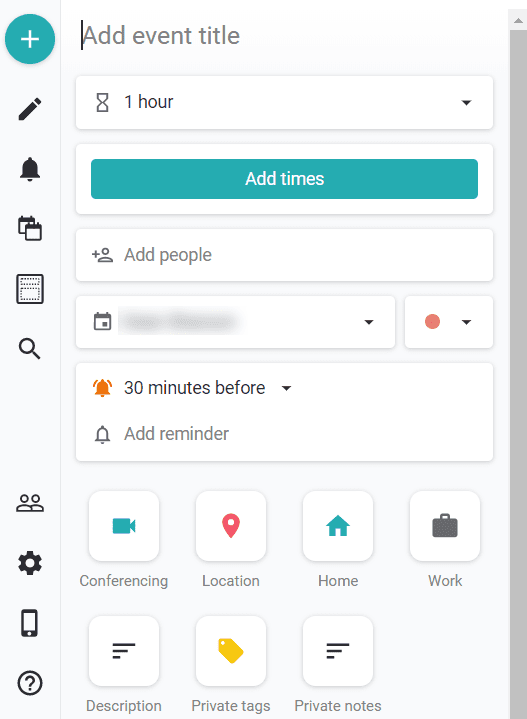
More commonly, though, you can expect to choose a “New blank event” in the middle. The new blank event delivers a form that you can complete to create a new event. Some of the elements in the form will be straightforward; other elements require a little more thought.
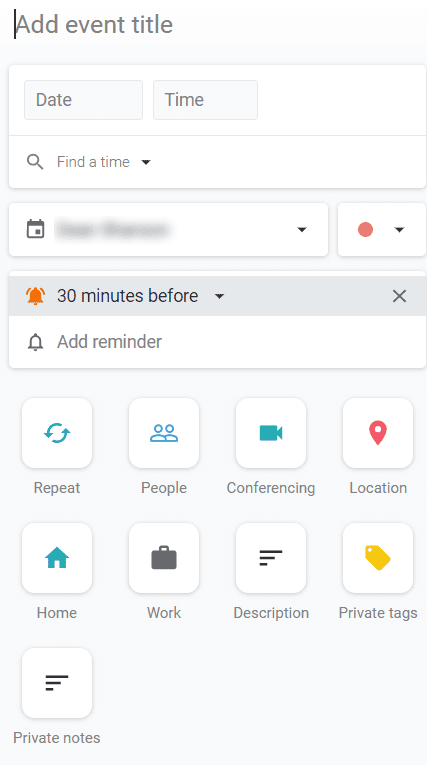
You’ll need to give the event a title and choose a date. Click the time button, and you’ll be offered a list of times to start the event. Woven will automatically give you an hour to complete that event, but you can change that end time, and if you don’t want to start or finish an event on the half-hour, you can type in a new time.
Woven does provide another option, though. Beneath the date and time is a link marked “Find a time.” Open that link, and you’ll get a drop-down menu that lists all the hours that you have free in which to fit the event. You can choose to list all your times instead of just all your free time, but the ability to see all of your availability in one list does make setting an hour a great deal easier.
But Woven doesn’t list all your free hours. It only contains the time that you’ve set as your work hours. Those are the times that you’re available. You can place events before those hours, but you’ll need to use the Time button above rather than the “Find a time” link.
Choose Your Calendar
Below the scheduling options, you’ll be able to choose the calendar on which to place the event and select a background color for that event.
Your choice of the calendar will be necessary. Choose to add the event to a calendar that isn’t listed under “My Time,” and it won’t be included when Woven checks for schedule clashes.
Event Buttons
Once you’ve chosen the calendar, you’ll be able to set the notifications. Below the announcements are a series of buttons that affect the event.
Repeat—Selecting this button makes the event weekly for one month. You’ll then be able to change both the frequency and the end date. To remove the repeat feature from the event, select the frequency menu item, and choose “does not repeat.”
People—It’s possible to invite others to the event from the “New Event” form. Select the “People” button, and you’ll get a drop-down menu that lists your contacts.
Conferencing—This option provides a field to enter your conferencing information.
Location—After the location field appears in the event data, Woven will begin suggesting locations as you start typing.
Home—One location that you can add quickly is your home location. Press the Home button, and you’ll be able to enter your home address if you haven’t done so already.
Work—The second preset location is your work address. If you’re using Woven primarily to schedule events at your workplace, expect to be using this location more than your home address.
Description—This field lets you add information about the event. Unless you delete it, the description will come with the line “Powered by woven.com/calendar,” which is a useful reminder that anything you write here will be seen by anyone who shares your calendar.
Private Tags—Adding tags to your events makes it easier to find and categorize. When you click this button, it will appear under a heading marked “Private information.”
Private Notes—Finally, private notes let you add more information about the event that other people won’t be able to see.
Busy or Free
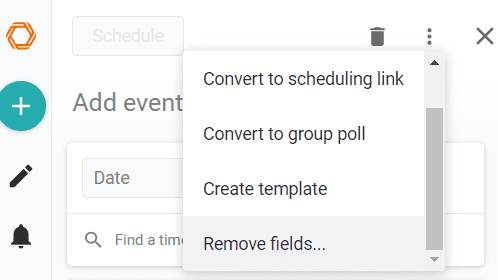
Each of those buttons makes adding information to your event simple. It is worth bearing in mind though that the delete options aren’t straightforward. To remove a field, you’ll need to press the three vertical buttons at the top of the page, scroll down, and choose “Remove fields…”
Beneath the big, shiny buttons at the end of the field is one more line—and this is important, even though it’s well-hidden. It adds a feature that extends the usefulness of the events significantly.
By default, when an event is added to a calendar, that time is marked as “busy.” Clicking that line at the bottom makes that time appear as free.
That can be valuable. You might want to schedule an event that still leaves you open to other interactions. For example, you might set aside two hours on Tuesday morning to read a report but always be available to take calls or office walk-ins. Selecting this option will let you fill your calendar without blocking your time.
The Other Way to Create an Event
You can reach this New Event form by pressing the plus icon at the top of the menu on the left. There is another way. If you click anywhere on the calendar, you’ll get the same initial new event options.
The difference is that when you click “New blank event” here, the time will already appear in the form.
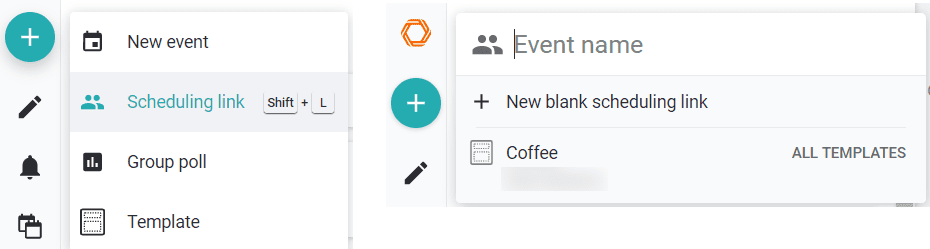
Scheduling Links
Creating a new event puts that event into your calendar. Selecting “Scheduling Link” from the menu triggered by the plus icon lets other people put events on your schedule. Again, you’ll be able to start writing the name of the event, and you’ll see event templates that you’ve created in the past. In the middle of the menu will be the option to create a “New blank scheduling link.”
Choosing that option opens a form similar to the one used to create a new event. At the bottom of the form are the same buttons—people, conferencing, location, and so on. Above that are the reminders and the choice of calendar. It’s the first field that makes the difference.
Beneath the field that lets you enter the name of the event is a button that sets the duration of the event. The default is an hour, but you can both expand and reduce that time.
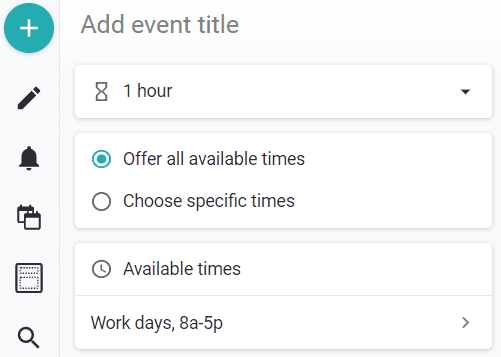
The next section lets you choose whether to offer all the times that you’re available or to select specific times. The default is to provide all possible times, and you’ll see them marked in red on the calendar itself. There is a good chance, though, that you’ll want only to offer specific times. You might not want to take a call in the morning, for example. Select “Choose specific times,” and you’ll be asked to “Add times” to send someone to choose.
When you’re finished, you’ll be able to select the “Create link” button at the top of the page. That will give you a Woven link that you can copy and send to other people. Or you can go back and edit the details of the event again.
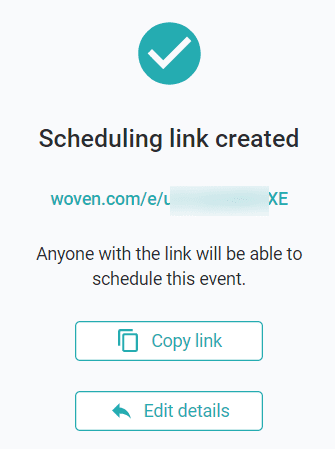
Once you’ve created the link, anyone receiving it will be able to choose a time that you’ve offered on your calendar.
Group Poll
The next piece of content that you can create are group polls. The process begins in the same way as other content items. Click the plus icon, and you’ll be able to enter an event name, choose a template, or select a “New blank group poll.”
Choose to create a new blank group poll, and you’ll receive a form that appears familiar.
You’ll have the usual button at the bottom, reminders, and the choice of calendars, but there are a couple of essential features here. The first is the “Add times” button. Selecting that button offers a list of possible times for the event based on your availability. Next to each hour is an “Add” option that lets you offer that time as a possibility.
The second important feature is to “Add people.” Adding people lets, you invite other people to take part in the event — and this is what the polls are all about. Each invitee will receive an invitation to the event, with a list of possible times. They’ll be able to vote for the time that works for them. As the invitee’s vote, you’ll receive notifications and the results. You’ll be able to choose the time that works best for everyone.
Woven points out that polls are especially useful for scheduling group events. These could be office parties, team dinners, and board meetings. They also emphasize that the person setting the event always gets to choose the time; the hour that wins the most votes doesn’t automatically win the poll.
Winning the poll is a useful feature even if you’re unlikely to use it for anything other than group events. Whether you’re organizing a baby shower and trying to get all a dozen friends together at the same time, or just trying to corral a couple of colleagues for a work dinner, avoid giving voters too many options.
When you hit that “Add times” button, you’ll get a complete list of the available times. It might be tempting to select as many as possible to give everyone a wide choice. That will make for confusing poll results. Instead, choose no more than three. Most people should be able to make one of them.
Create a Template
Templates are Woven’s outstanding feature. Their first role is to make creating events easier. Instead of entering the same details into events that retake place time and time, you can hit the template and select the time you want. All the other information relating to the event — its title, location, invitees, description, and so on — will all remain the same.
If you have an occasional poker night, you could create a template that included the location and a description that explained the limits and the rules for the night. When you felt like inviting your friends to take part, you could pick the template, create the event, and issue the invitations.
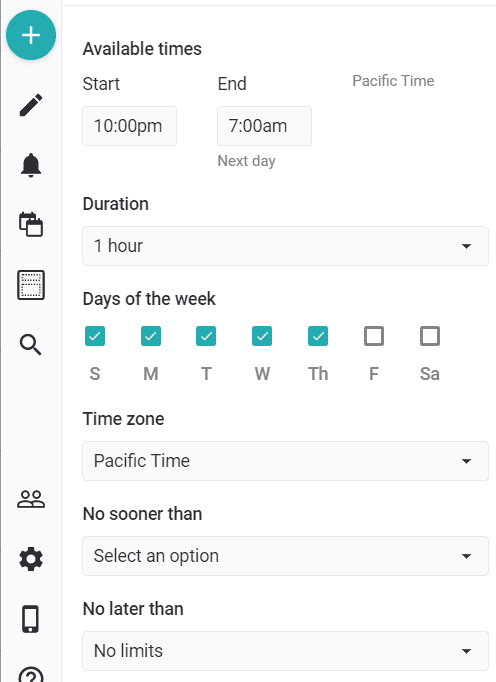
There are a couple of essential things to pay attention to here. The first is the available times. Woven describes its templates as “smart.” Instead of defining a particular time for a template, you can set a range of times at which you’re available for that activity. You could create a template for a game of badminton, for example, and state that you’re available between seven and nine in the evening.
Select the hours listed under “Available times” and choose the start and end times. You can also pick the days of the week you’re available, and select “no sooner than” and “no later than” times.
Scheduling Links in Templates
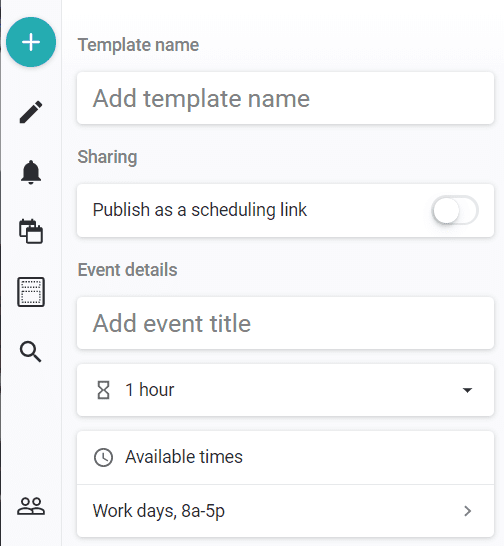
But the templates have another benefit. When you create a template, you’ll be able to publish the event as a scheduling link.
Toggle the switch under “Sharing” marked “Publish as a scheduling link,” and the event won’t be added to the calendar. Instead, you’ll get a link that you can send to others. So if you wanted to challenge a friend to a badminton game, you could create the template, then send them a scheduling link so that they can pick a time. You can think of it as a kind of one-person poll.
We’ve already seen how to create scheduling links for one-time meetings.
To create a “published scheduling link” in a template, first, select the times you’re available then toggle the switch. You’ll be able to edit the URL to make it friendlier, then send it to a friend. They’ll be able to choose a time, and the event will be added to your Woven calendar.
Every time you wanted to challenge someone else to that badminton game, you could pull up that template, copy the link and send it.
Clearly, this makes for a broad range of uses. You could offer times for sales calls, training meetings, or house viewings. It’s a straightforward and handy way to give other people the freedom to choose times within your set parameters for specific events.
You can find a complete list of your templates by clicking the templates icon on the left menu, or by pressing Shift+T.
Availability Sharing
The big difference between traditional calendars and digital calendars is the ability to share schedules. Users of platforms like Google Calendar and Microsoft Exchange Calendar can set different levels of privacy. They can let clients see when they’re available, colleagues see their work meetings, and relatives can see what they’re doing all the time so that they can schedule family dinners and celebrations.
Woven doesn’t provide that level of choice. Click the “Availability sharing” icon, and you’ll be able to see who’s sharing the Woven calendar with you, and who you’re sharing your Woven calendar with.
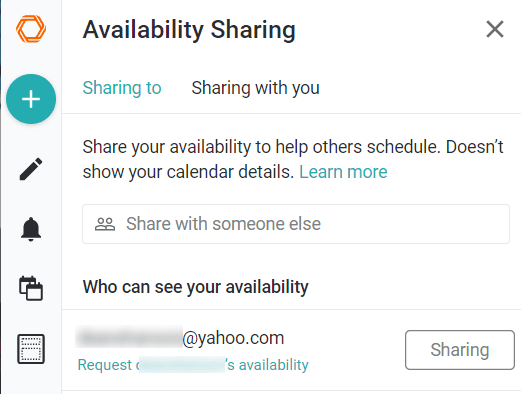
To share your availability, enter the email address of the person you want to show your schedule. If they’re already on Woven, they’ll receive a notification. They will immediately be able to see when you’re busy and when you’re not. If the person you’re sharing with isn’t on Woven, they’ll receive an invitation to join. As soon as they register, they’ll be able to see your availability. They’ll also be able to search through your schedule to find a time when you’re free.
What they won’t be able to do is make any changes to your events. Nor see what you’re doing at those times.
You can also ask to see someone else’s availability by clicking the “Sharing with you” link at the top of the section. Enter the person’s email address, and they’ll receive your request. Once they give their approval, you’ll receive a notification and will be able to see their availability.
How to Set Availability Levels in Woven
The inability to set privacy levels on Woven is a big drawback. It’s likely a result of the platform’s origins as a workplace tool on Facebook. People who use Google Calendar are more likely to be willing to share their personal diaries with family members so that events like birthdays and school meetings aren’t missed. People in different departments at Facebook will be less willing to show everyone what they’re doing all day. They need to able to indicate when they’re doing it.
Woven is also unusual in that it depends on other calendar platforms. It doesn’t expect people to stop using their Google Calendars or their Apple Calendars. It draws events from those calendars and blocks out the time they take.
So if you want to share more than your availability, you’ll need to do it on your primary calendar. You’ll need to remember to go back to Google Calendar or Apple Calendar and share the schedule from there. That means that someone looking at your Woven calendar and wondering what you’re doing next Thursday at seven in the morning would have to back to your other calendar and, if you’re sharing it with them, view your schedule there.
In practice, that means you’re going to be using Woven to set up work meetings and to invite clients to book times based on templates. For everything else, you’ll be using your other digital calendars.
Conclusion
Woven offers a few more features than those we’ve discussed here. You can also use the menu on the left to view your updates and keep track of events and polls that you’ve scheduled. But on the whole, Woven is a reasonably straightforward platform with some powerful additional tools. The ability to create templates to create events quickly is a useful addition to calendar functions. Being able to send those templates to clients then so that they can book events quickly makes scheduling very simple.
The platform’s simplicity, though, also weakens it. Woven isn’t a platform that meets every use case. Expect to be using it within a large organization but keep your other digital calendar for managing your social life.
Updated on February 3, 2023
John Rampton
John’s goal in life is to make people’s lives much more productive. Upping productivity allows us to spend more time doing the things we enjoy most. John was recently recognized by Entrepreneur Magazine as being one of the top marketers in the World. John is co-founder and CEO of Calendar.